Memberships

CU Licenses


Go to Freebies Post Dated Feb. 22, 2011 its in the second set third one down.
I am using the artwork of Jennifer Janesko you must
purchase a license to use her artwork. You can do so
HERE at Creative Design Outlet
I am using the artwork of Jennifer Janesko you must
purchase a license to use her artwork. You can do so
HERE at Creative Design Outlet
My Tutorials are strictly my own creations if they
resemble anothers it is purely coinsidense.This is
written with PSP X2 but I am sure will
work in any other PSP's as well. And for those
that have basic knowledge of PSP.
I used same drop shadow threw entire Tut mine was 2,4,50, 5 black.resemble anothers it is purely coinsidense.This is
written with PSP X2 but I am sure will
work in any other PSP's as well. And for those
that have basic knowledge of PSP.
Feel free to use what you feel comfortable with.
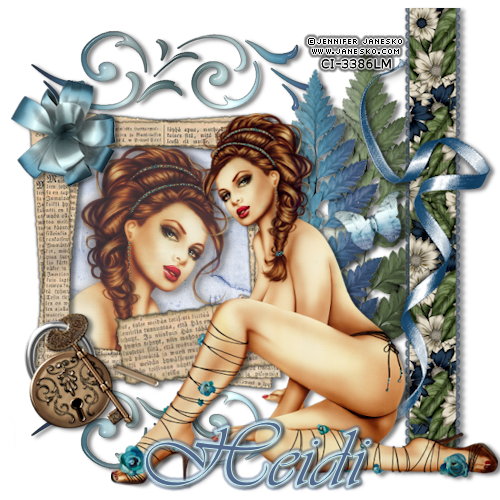
Open new image of 650 by 650 I always start large and resize later.
Open Leaf2.psd edit-copy, edit-paste as new layer, image-mirror place to right of canvas. (due to the lightness of the tube it fits better mirrored but you may like it the way it is) Add drop shadow if you like.
Open Leaf1,psd edit-copy, edit paste as new layer, image-mirror place to right of canvas placing slightly lower in height then Leaf2 see mine for placement. Drop Shadow.
Open ribbons.psd in scrap kit edit-copy, edit-paste as new layer onto your new image. Image-free rotate, Left 90 rotate single layer. Place this to the right of your canvas. You can check back to mine for placement as well. Drop Shadow
Open frame.psd edit-copy, edit-paste as new layer placing to the left of canvas.
Due to the tube I am choosing to use I had to resize my tag at this time in order to use the closeup I wanted. But you may not have to if your using an image with a larger closeup and prefer larger tags I hit image-resize and went 500 pixels make sure its pixels and not percent. if your resizing with me make sure to resize all layers.
Now on frame layer click inside with magic wand. you should see marching ants inside the frame next go to selections-modify-expand by 10.
Open notebook.psd go to edit-copy then edit-paste as new layer make sure it is below the frame and place so only paper is visible below the frame and no edges. Then go to Selections-invert and hit delete
Open your close up and edit-copy, edit-paste as new layer below frame above notebook. Still on tube layer you should still have your marching ants inverted so you should only have to hit delete on tube layer. Selections-Select None.
On your closeup of your tube go to layer-duplicate, next on top layer of closeup go to
adjust-blur-Gaussian Blur at 5 ok. then change layer to soft light and merge down only closeups lower opacity of closeup to 80%. add drop shadow if you want. Also to frame.
Open doodle2.psd Image-resize-75% then edit-copy, edit-paste as new layer. Layer-duplicate. Image-flip so you now have a doodle on top and bottom of your frame. Add drop shadow to both.
Next open full tube image-mirror, image-resize 75% make sure single layer checked. Drop shadow.
Open bow1.psd image-resize 50% edit-copy, edit paste as new layer place in top left corner of frame. Drop shadow.
Open key_lock.psd image-resize 75% edit-copy, edit-paste as new layer on lower left of frame. image-free rotate left 20 degrees. Add drop shadow.
Open butterfly1.psd image=resize 35% edit-copy, edit paste as new layer. image-free rotate left 20 degrees. Drop shadow.
Add Artists copy right info. And any other things you would like to add save as png.
Example of anothers try at this tutorial

Subscribe to:
Post Comments
(Atom)
My Blinkie

I CT For


My Group

My Fav Blogs


I'd love to know what font you used for the name.
ReplyDelete