10:56 PM | Edit Post
My Tutorials are strictly my own creations if they
resemble anothers it is purely coinsidense.This is
written with the use of PSP X2 but I am sure will
work in any other PSP's as well. And for those of
that have basic knowledge of PSP.
You Will Need.
Art I am using is from Ismael Rac along with the HD plus pack From Bossy at Electric Fairy Floss you can check out her sight HERE
And this Awesome "New Attitude Tube" From Rac you must purchase a License to use His art you can do so HERE
And this Awesome "New Attitude Tube" From Rac you must purchase a License to use His art you can do so HERE
PlugIns Needed Xero-Porcelain Scroll down some Free HERE
Greg's Factory Output Vol II-Pool Shadow Free HERE
Greg's Factory Output Vol II-Pool Shadow Free HERE
Font Gritzpop Grunge you can buy HERE
But here are some cool Free ones HERE
Mask I am using is 567InsatiableDreams you can Scroll to bottom to Free HERE
Open Temp supplied in the kit. Hold Shift+D to Duplicate close original and work on copy.
On Circle layer Selections-Select All, Selections-Float, Selections-Defloat. Add New Raster Layer. Open Paper 1 Edit-Copy. Back to Temp Edit-Paste into Selection. Select None. Close off Temp Layer and Add Drop Shadow to Paper Layer.
Small Rectangle Layer Adjust-Add/Remove Noise-Add Noise-Uniform-Monochrome 56. Drop Shadow.
Open Glittersplat Edit-Copy, Back to temp on top of Overlay Layer Paste as new layer. Position to right of Temp. Drop Shadow
Frame Edit-Copy, Edit-Paste as new layer leave in middle Image-Resize 80%. Drop Shadow
Sparkles Edit-Copy, Edit-Paste as new layer on top of Frame Layer. No Shadow.
Open Paper 3 And keep it open we need to use it several times. So go ahead and Edit-Copy.
Working on Angled Rectangle 1 Layer Selections-Select All, Selections-Float, Selections-Defloat. Add new Raster Layer Edit-Paste Into Selection. Open Close Up of Tube NewAttitudeHD03.PSD Choose how you like I chose the Blonde Layer. Edit-Copy Special- Copy Merged, Edit-Paste as new Layer. Position into the Marching Ants. Selections-Invert, Hit Delete. Selections-Select None.
Still working with what we just did I changed the paper Layer to Luminance(Legacy) Then Duplicate Tube. On top Layer Adjust-Blur-Gaussain Blur-3 Also change to Overlay. On Bottom Tube layer Apply Xer-Porcelain. And Add Drop Shadow.
First Back to the Paper 3 we have open. Image-Flip, Edit-Copy.
Now Working on Angled Rectangle 2 Selections-Select All, Selections-Float, Selections-Defloat. Add New Raster layer. Edit-Paste Into Selection. Open Close up of tube again this time choose what layers you want I left the purple and black hair open and Edit-Copy Special-Copy Merged. Edit-Paste as new Image. Then Image-Mirror. Edit-Copy. Back to Temp Edit-Paste as new layer. Postition to your liking. Selections-Invert. Hit-Delete. Select-None.
Still working with what we just did I changed the paper Layer to Luminance(Legacy) Then Duplicate Tube. On top Layer Adjust-Blur-Gaussain Blur-3 Also change to Overlay. On Bottom Tube layer Apply Xer-Porcelain. And Add Drop Shadow.
Open Main Tube you are using mine is NewAttitudeHD01.PSD Edit-Copy Special-Copy Merged, Edit-Paste as new layer. Image-Resize 95%. Place in middle. Add Slight Drop Shadow.
Open Bear Edit-copy, Edit-Paste as new layer. Image-Resize 55%. Place in lower right of Temp. Add Drop Shadow.
EyelitNRibbon Edit-Copy, Edit-Paste as new layer. Image-Resize 80% Image-Free Rotate Right 5% Single Layer. Place in between Rectangle Frames so looks like attached to both of them. Add Dark and Wide Blur Drop Shadow
ThronedHeart Edit-Copy, Edit-Paste as new layer. Image-Resize 45% Place in upper right of Temp. Add Drop Shadow
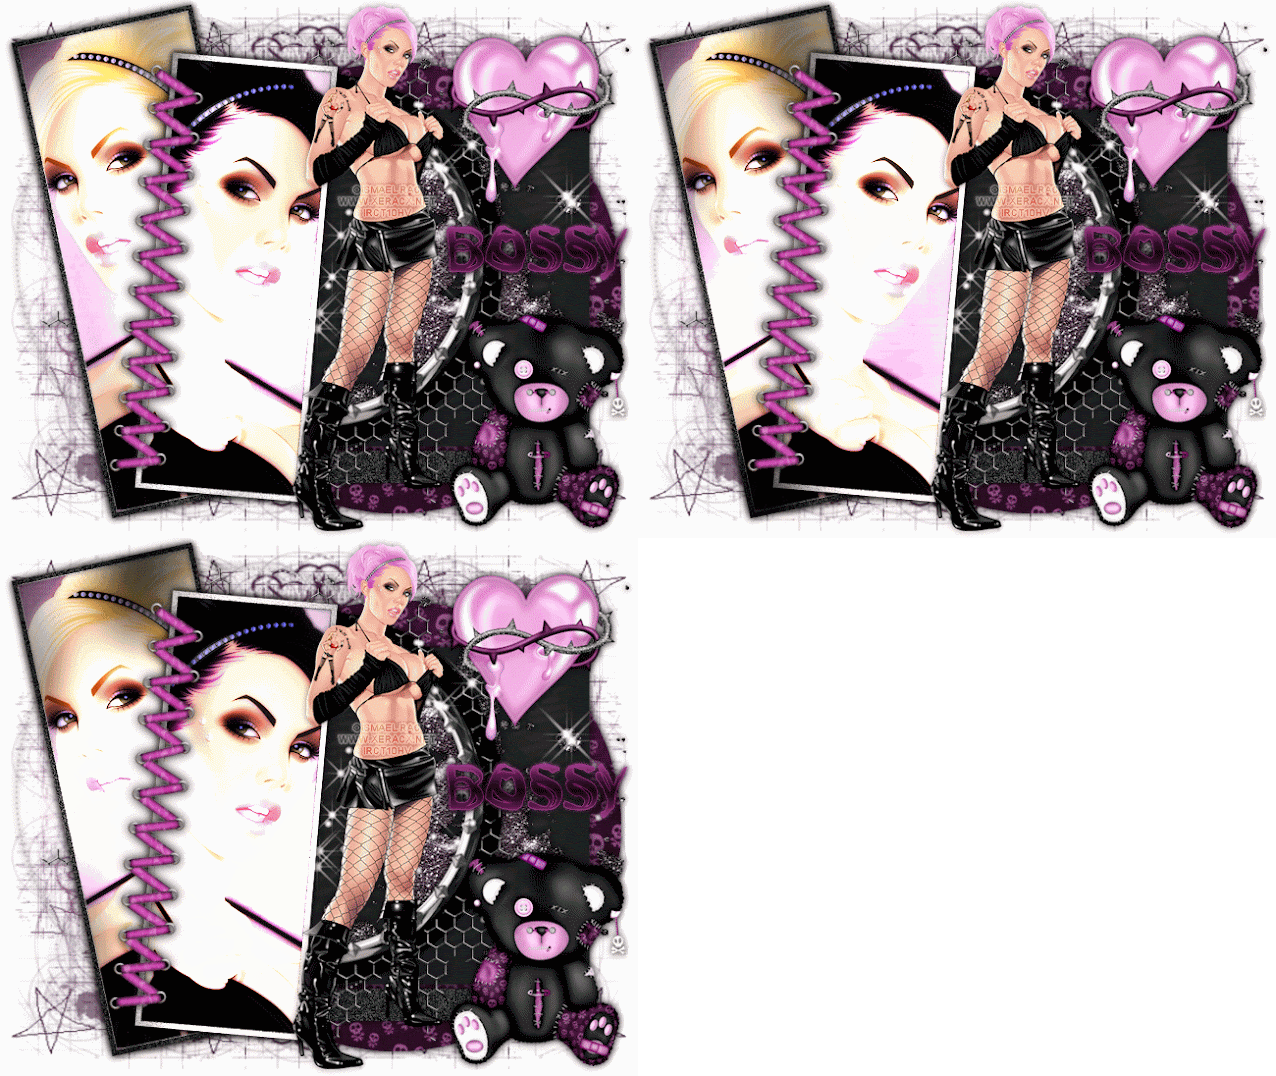
Now Choose colors from your tag to make a slight Gradient I chose the two purples in the Paper we used in the circle. Then Add new Raster Layer and FloodFill with Gradient we made. Layers-Arrange Send to Bottom. Now Apply Mask 567InsatiableDreams. Merge Group. Move to upper left of Tag. Duplicate Image-Mirror, Merge Down. Duplicate Image-Flip. No Shadow.
Image-Resize All Layers Checked to 650 on longest side or whatever size you prefer.
Add Proper Copy Right.
Add name with Gritzpop Grunge Font. Place to your liking. I also used the Gradient we previously used and Added Drop Shadow.
Now if you are not going to Animate now save as PNG. And thank you so much for trying my Tutorial.
For Animation.
Open Raster 1 of the Backgound Layer. Should be white. Layers-Arrange- Send to Bottom
Now I closed off all layers but the Rectanlge 1 layer and all that goes with it the paper the close up and duplicate etc. And Merged Visable. Close this layer Then I Opened the Rectangle 2 Layers and merged Visable there close this layer. Then I opened the layers on top of them And merged Visable and closed off this layer. Opened all bottom layers and merged them visable. So now we should have four layers. The bottom, Rectangle 1 set, Rectangle 2 set, And top.
Duplicate Rectanle 1 Set twice so you have three layers. Now on Bottom layer Apply Greg's Factory-Pool Shadow. On Default Settings, Close Layer and on second Apply it agin changing Diagonal to 75 Close Layer, On Third one apply Pool Shadow Diagonal 100. Leave open Top Layer.
On Rectangle2 Set duplicate till you have three layers. Now on Bottom Layer apply Pool Shadow Diagonal at 100 Close layer, Second layer apply pool shadow Diagonal at 75 close layer, On Third layer Apply Pool Shadow Diagonal 50. Leave open top layer.
Edit-Copy Special-Copy Merged.
Open Animation Shop.
Edit-Paste as new Animation.
Back in PSP Close off Top Rectangle 1 and 2 and Open Second 1 and 2 sets. Edit-Copy Special-Copy Merged.
In Animation Edit-Paste After Current Frame.
Back in PSP Close off Second Rectangle Layers 1 and 2. And Open First Layers to Rectangle Layers 1 and 2. Edit-Copy Special-Copy Merged.
In Animation Edit-Paste After Current Frame.
Edit-Select All.
Animation-Frame Properties Change to 20.
File Save As. Name Animation And So on.
Thank you for Trying my Tutorial.
Labels:PTU Tag Tutorial
Subscribe to:
Post Comments
(Atom)
My Blinkie

Categories
- Animations By Rebel Dezigns (7)
- Animations By SophisticatSimone (20)
- Animations Designs By Kiya (5)
- award (5)
- Blog Train (11)
- Charles R. Bristow (1)
- CU License (1)
- Exclusives (7)
- FTU 68 Scripts (1)
- FTU Alpha (2)
- FTU Clusters (8)
- FTU Scraps (23)
- FTU Tutorial (16)
- FTU WallPaper (1)
- PTU Pixels (1)
- PTU Scraps (8)
- PTU Tag Tutorial (6)
- Tag Show Off (5)
- Tag Templates (5)


0 comments:
Post a Comment