3:37 PM | Edit Post
My Tutorials are strictly my own creations if they
resemble anothers it is purely coinsidense.This is
written with the use of PSP X2 but I am sure will
work in any other PSP's as well. And for those of
that have basic knowledge of PSP.
You Will Need.
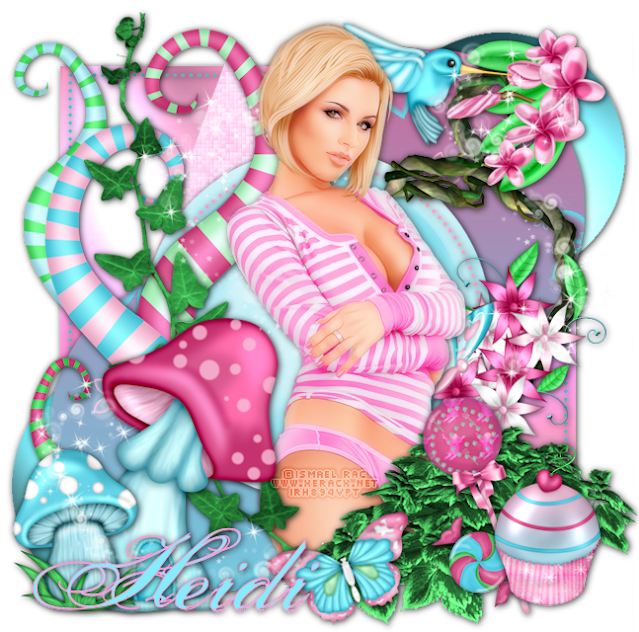
Art I am using is from Ismael Rac Tube called "ColdSummerNights" you must purchase a License to use His art you can do so HERE
Scrap Kit Fairy Fantasy you can get under "FTU Scraps"
PlugIns Needed Xero-Porcelain, Greg's Factory Output Vol II-Pool Shadow.
Font Porcelain you can get HERE
Template "Love Me or Hate Me" You can get HERE
Open Temp Hold Shift+D to Duplicate close original and work on copy.
Close off Or Delete Credit Layer, Word Art Layers, Black Heart Layers, Pink Heart Layers Black Squares,
Now I changed several Layers of the Temp to colors better fitted for my kit and tube.
Effects-Photo Effects-Black and White Film. Then used Adjust-Hue And Saturation-Manual Color Correction, Source-Gray, Target new color.
Quick Run down of what I changed with that process. Black Dotted Circle Layer-to Pink, Bottom and Top Dotted Squares-to Blue, Top and Bottom Gradient Squares- to Pink, Top and Bottom Gradient Circles-To Blue. ( I also Applied Greg's Factory Output Vol II-Pool Shadow I Played with the settings to your liking) to the bottom Gradient Circles and Squares.
I merged Top Right Circle onto Bottom Left Circle So one Layer now. Selections-Selections All, Selections-Float, Selections-Defloat, Selections-Modify-Smooth Default settings 10 and 10. Open Paper 3 Edit-Copy, Edit-Paste as New Layer, Selections-Invert, Hit Delete, Selections-Select None.
Now Center Pink Circle Layer, Selections-Select All, Selections-Float, Selections-Defloat, Selections-Modify-Smooth Default. Add New Raster Layer. Open paper 14 Edit-Copy, Edit-Paste into Selection. Select None.
Working with the Elements now feel free to check back to mine for placement. Or play with the elements and add your own flavor to it.
Open Vine Element Edit-Copy, Edit-Paste as new layer, Image-Flip. Place to right of tag.
Magic Tree Element Edit-Copy, Edit-Paste as new layer. Place to left side of tag. Image-Resize 85%.
Open Flower Bunch Edit-Copy, Edit-Paste as new layer. Image-Resize 80% Image-Mirror place to lower middle right of tag.
HummingBird Edit-Copy, Edit-Paste as new layer. Image-Resize 65%. Place in upper right side of tag.
Open Tube. If using same tube as mine Resize 65%. Then duplicate tube. Working on top layer. Adjust-Blur-Gaussain Blur 4.00. Then change Layer to Soft Light. On Bottom Layer Apply Xero-Porcelain default.
Ivy Element. Edit-Copy, Edit-Paste as new layer. Image-Mirror place to left of tag.
Mushroom1 Edit-Copy, Edit-Paste as new layer. Image-Resize 80%. Place to left of tag.
Mushroom2 Edit-Copy, Edit-Paste as new layer. Image-Resize 65% Image-Mirror. Place on left side of tag. more left then first mushroom
Open Leaves Edit-Copy, Edit-Paste as new layer on right side of tag. To help cover the tubes bottom.
Lolli Edit-Copy, Edit-Paste as new layer. Image-Resize 55%. Image-Free Rotate 20% Left, single layer checked.
Open Candy Edit-Copy, Edit-Paste as new layer Image-Resize 50%. Place on bottom right corner of tag.
Cupcake1 Edit-Copy, Edit-Paste as new layer. Image-Resize 50%. Place in lower right corner.
Open Butterfly2 Edit-copy Edit-Paste as new layer. Image-Resize 50%. Image-Free Rotate Left 20 Single Layer. Cover rest of bottom of tube that shows.
Sparkles Edit-Copy, Edit-Paste as new layer. Now I clicked on Tube layer. Selections-Select All, Selections-Float, Selections-Defloat. Then clicked back on the sparkle layer and hit delete. This gets rid of the sparkles on the tube but leaves them to sparkle on all the elements.
Now Resize Entire Tag to 650 on longest side or smaller if you prefer.
Delete All Un-needed Layers.
Now I added drop shadow of 1,1,82,10 to most layers but not duplicate of tube and sparkles. And on some wanted darker so added (-1,-1,82,10) Also.
Add Proper Copy Right for Art Used. If using the same as myself ©Ismael Rac www.xeracx.net with your personal License Number as well. Make sure this is clear to others as well.
Now Sharpen what layers you want. Add name Font Porcelain. Add Drop Shadow to name.
Save as PNG.
Thank you for trying my Tutorial!!
Labels:FTU Tutorial
Subscribe to:
Post Comments
(Atom)
My Blinkie

Categories
- Animations By Rebel Dezigns (7)
- Animations By SophisticatSimone (20)
- Animations Designs By Kiya (5)
- award (5)
- Blog Train (11)
- Charles R. Bristow (1)
- CU License (1)
- Exclusives (7)
- FTU 68 Scripts (1)
- FTU Alpha (2)
- FTU Clusters (8)
- FTU Scraps (23)
- FTU Tutorial (16)
- FTU WallPaper (1)
- PTU Pixels (1)
- PTU Scraps (8)
- PTU Tag Tutorial (6)
- Tag Show Off (5)
- Tag Templates (5)


0 comments:
Post a Comment